
Lets put the cards on the table… If you’re getting into defensive shooting, concealed carry or, god forbid, you’re an old school shooter willing to learn up-to-date Modern Technique, this should be helpful. The real reason I’m writing this however, is just because I think I’m cool and I like watching YouTube videos of myself.
I’m mostly kidding—well maybe not mostly—but getting back on topic, we’re going to examine my first ever video of me doing a live-fire defensive drill, and I promise to point out my faults and not just my Clint-Eastwood-fast draw (it’s not really that fast). I’ve been practicing modern weapon manipulation on a Glock 19 replica for 6 years (starting long before I could own a gun), as well as 18 months of drawing from concealment. Now I’ve been concealed carrying my Glock 19 for 6 months, I have done plenty of dry practice at home, as well as live fire practice on the range. Finally it seemed like time to film myself for analysis to start honing my technique. I expect this to be the first in a series of similar posts about my progress, but here I will also outline the basics of concealed carry.
Looking at the video (particularly the slow portion), we’ll go through my draw/”presentation,” extension to target, shooting, movement, and an analysis of my shot placement. All of this will of course be filtered through the consideration of speed, as you don’t have time to dilly dally with your life on the line. As time will be an overarching theme, it’s worth mentioning up front that time is not everything in defensive shooting. Many tacticool, super-leet gunfighters worry about hundredths of a second on their draw time, and while I am timing myself from draw to first shot, that time is completely irrelevant if you can’t do it accurately 100% of the time. You should assume that any mention I make of speed is under the assumption of accuracy. If you miss even once you need to slow way down.
Concealed Carry
I’m not a professional firearms trainer, nor can I even say that I have professional training under my belt. You should therefore take anything I say with a grain of salt, but I’d like to think I’m an accomplished information filter, and I can generally discern the pros’ advice from that of the super-leet gunfighters. Hopefully if you’ve seen videos by the former, my video will demonstrate that I’m on the right track. I digress.
Concealed carry… What’s this all about? Lets start by saying that many states require a permit for it and in New Hampshire I am permitted to carry concealed; make sure you’re obeying the law. Concealed carry (CC) is when you use some form of holster to carry a gun in public, out of view of the public. It is the alternative to open carry, which is the act of carrying a firearm that is in full view of the public (like a police officer does). Naturally there are unique considerations for CC, as it requires a holster that can effectively hide the gun from view and it also puts garments in between you and drawing your gun. Make no mistake. Drawing from concealment is a whole different ball game than drawing from an open holster. Doing it quickly and effectively—without shooting yourself or dropping your gun—takes practice and coordination.
My Draw
Lets look at my draw-and-shoot drill. As we go I’ll cover what I did and how it differed from ideal form.
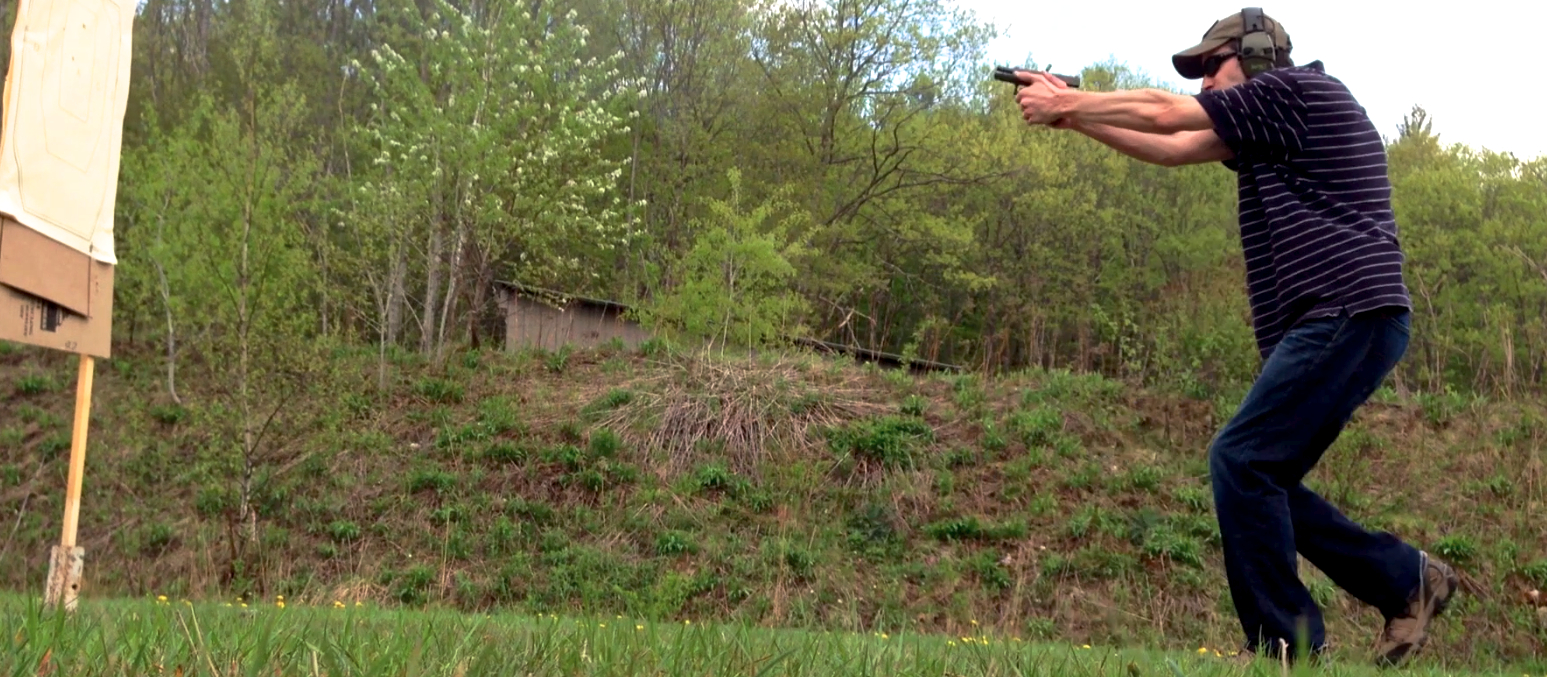
First lets look at the drill. I was simulating a situation in which a threat is about 8ft away from me. This is a likely distance if someone were to confront you in public. In a perfect world this drill should be performed under more stress, however the range I have access to does not allow for stress-inducing stimulus (most people are in my situation) so I do my best. I like to start by either walking up to the “confrontation location” or beginning by facing another direction and turning slowly. This simulates a behavior that would naturally be taking place when confronted by a dangerous threat in public. In the video, we assume I was walking and was stopped by someone in my path. I pause to assess the threat and then we’ll assume the threat level is escalated when he/she produces a knife or gun and makes a threatening motion towards me. At this point I’ve made the decision to draw with the intent of using lethal force (this might sound like a lot, but it’s important to form a scenario in your mind to make your practice realistic).
 I know the video angle doesn’t help with seeing my gun side, but I’m carrying my Glock 19 in a hybrid holster (leather backing against me, with molded kydex to secure the gun) IWB (Inside the Waistband) at about 3:30 o’clock on my body (a bit rearward of the side of my hip). You’ll see that I sweep my left hand across my body and lift my shirt. This can be done with one or two hands. Two is recommended but I seem to like one. Either way, it should be done aggressively, yanking your shirt hard to ensure that you overcome any snags. In this drill, I only lift my shirt as high as the bottom of my ribs to clear the gun. What I should have done was lift all the way to my armpit. In one similar drill, the same day, I snagged the gun on my shirt because of this mistake. Lifting the shirt to armpit height helps to clear the gun, but will also serve another purpose in a second.
 As I tug up on my shirt, you see my right hand raise up above the gun. With the shirt clear, I then firmly thrust my right hand down to get a firm grasp on my Glock. This is exactly what should be done before drawing. An amateur mistake would be to try to draw the gun in a single upward stroke. This is a sure way to fumble it.
With a solid purchase on the Glock, you’ll see that I draw straight up at the same time as I release my shirt. As the gun reaches the top of my upward stroke, both hands move forward and come together on the gun about 6 inches in front of my body, about equal with the bottom of my right peck. This was a mistake. As I mentioned, I should have drawn my shirt higher. The idea is that where the left hand ends up after lifting the shirt is where the gun comes up to meet it. The two hands should meet about 3 inches higher then I did in my drill, meaning that I should have pulled the shirt higher and also moved the gun a bit higher on my draw stroke, before beginning to extend forward.
Many who are new to drawing from concealment find it awkward to raise the gun that high while staying so close to the chest. The two hands should come together on the gun about 4 inches directly in front of the right peck (we’re assuming a righty), before driving the gun forward. This makes the up stroke of the draw, and the press forward to the target, two distinct motions. They should be. My mistake was blurring these two motions a little at the point where the hands connect on the gun. The reason for bringing the gun up to this position is that it allows you to drive the gun out on target, with the gun already nearly at eye level. This facilitates fast aiming and the ability to take a reasonably-accurate shot while driving the gun out, if the threat is extremely close.
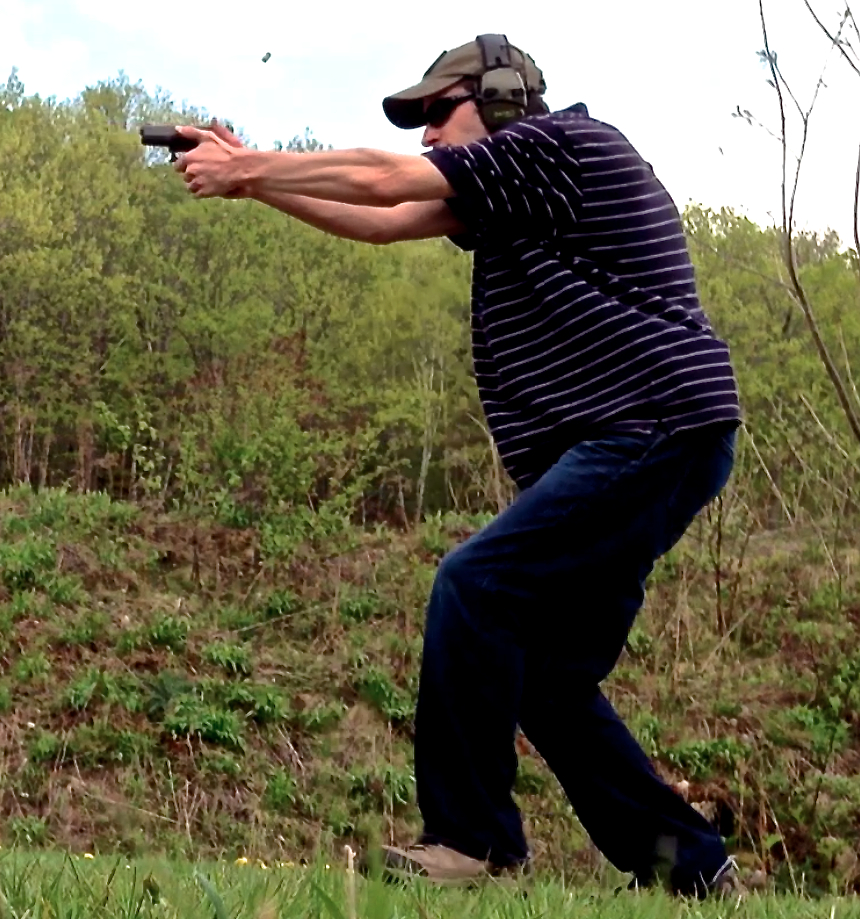
This leads to my next mistake. While my first shot impacted the perfect spot (center of the chest, in the upper area of the center rectangle on the target), I have to admit that I did not acquire a clear view of my front sight as I should. The gun was lined up with my right eye when I took the shot, but during this whole drill my eyes were fixed on the target. As I still haven’t developed an instinct for fixing my vision on the front sight, I still find it hard to imagine it would be most effective in a defensive situation. Nonetheless, the pros recommend it and I can say that it is more accurate when you focus. To test this, fire ten shots at a silhouette target in ten seconds, focusing on the target. Now do it again, making sure you have the front sight in sharp focus. You’ll group better when you focus on the sight because it ensures that you compensate constantly for any pull off target. I intend to commit this to habit and muscle memory before committing to thinking that focusing on the target is a better plan for defense. I’ll just share that my thinking for now is that for close range defense, it’s faster and more reliable to look at the target, where as at range or when shooting at a bullseye, it would make more sense to look at your sight.
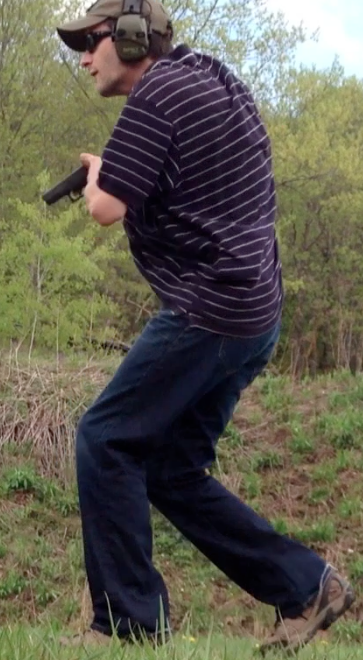
 Completing the picture of the simulation, I added motion to this drill. Stationary targets are dead targets. You should therefore be moving while you shoot. Forget what you’ve heard about ideal shooting stances. Gun fights don’t happen on the firing line, and you aren’t going to be able to configure your perfect stance before engaging a threat. You damn well better be moving in a real life gunfight, so that’s how you should practice. On that note, I was in error to step straight backward during my draw. You should always be stepping out of the line of fire during your initial draw. I should have side-stepped during the draw, before moving backward. I choose to move backward for this kind of drill because distance favors the trained and makes it more likely that the bad guy will miss.
That wraps up my mistakes, so we’ll recap them before I complete my analysis. I should have tugged my shirt higher when clearing it, as well as drawing higher on my initial upstroke. Together these would have helped my hands come together on the gun about 3 inches higher and 2 inches closer to my chest. Doing so would have helped put the gun in my line of sight faster, helping me acquire a proper sight picture before firing my first shot. I also should have side-stepped during my draw, before distancing myself from the target.
Going frame-by-frame through my video, I timed my draw at 1.47 seconds. This is from the moment my left hand began moving across my body to my shirt, to the moment I fired. I would place my long-term goal at 1 second, while maintaining form and accuracy. I would be happy at 1.2 seconds, but would want that to be with someone calling a “threat” command, to add the element of reaction time. I suspect my reaction time will add a quarter second.
Once up and firing, I fired 4 rounds in 0.75 seconds. I like to train with firing 4 rounds, center mass, before pausing to assess the status of my target. I will then fire another 4 rounds if I deem the target to still be a threat. This is better handled with a partner calling the scenario to remove predictability. Back to timing, I definitely intend to get those 4 shots down to half a second (assuming they’re all in the center rectangle). All told, I’d like to be able to go from standing ready to having fired 4 shots in under two seconds total.
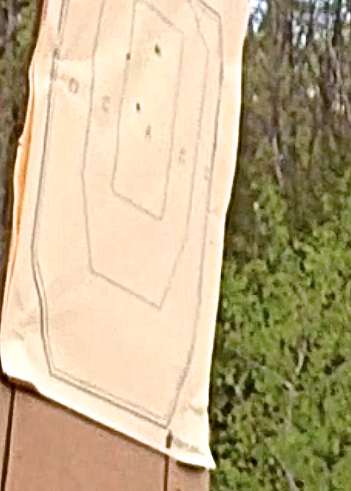 Looking to shot placement, I was pleased. My first shot is hard to see in the video, but it hits a quarter inch right (from my perspective) of center, near the top of the rectangle. My second shot hits lower and an inch or so left of center. This is the only questionable shot, in terms of hitting vital organs, however I think it would hit the top of the liver. The third shot widens the hole from my first shot, putting two bullets almost definitely in the heart. The fourth shot hits the left edge of the rectangle and would have punctured the attacker’s right lung. Thinking of this in terms of incapacitating an attacker, the two heart shots would not only destroy the heart, but would have the potential of reaching the spinal column if they weren’t deflected. These two shots would provide the best chance of immediately incapacitating the attacker, while the punctured lung would “help” ensure an effective stop. The second shot on its own would have been less likely to stop a determined attacker immediately, but it was definitely a center mass hit, so I won’t complain. These four shots would have been lethal and would have been likely to stop the fight right away.
What’s not in this video?
F.A.S.T. Fight, Assess, Scan, Top Off. You see fight and assess in the video, as I’m assessing the status of my target after I fire my shots and begin retracting my gun to the “retention” position (the same place where your hands meet on the gun during the draw and presentation). When happens out of frame is my scan and top off (though in this case I failed to top off). After shooting, the gun should return to retention as you assess your target. At this point you are still ready to fight. Once you are no longer in immediate danger from your target, it’s time to scan your surroundings for new threats. At this point you should take your gun—currently in retention position—and raise it up so it points skyward for safety. You then look left and right, moving your upper body and gun with your eyes to ensure that you’re ready to engage a new threat. Next you should turn around 360 degrees (most people choose counter-clockwise), scanning your environment for threats and also injured bystanders that may need help. Once you’ve stopped the threat and confirmed that you’re safe, you should change out your mag for a fresh one before slowly and carefully re-holstering; it would suck to shoot yourself after concluding a gunfight, because you rushed your re-holster with adrenaline-charged flippers for fingers. The fresh mag ensures that if a new threat presents itself, you have the ammo to handle it. You should retain your partially spent mag as your spare. If you don’t carry a spare mag every day, I don’t recommend working a mag change into your practice. I’ve noticed that a lot of people who CC practice on the range with an open holster. Likewise I see people who don’t carry a spare mag using an external dual mag pouch for mag changes. Reloading looks cool and glamorous, but if you don’t carry a mag you’re wasting time. By the way though… depending on where you look, 51-70% of attacks involve multiple assailants. Either way, odds say you’re getting attacked by two or more people. A spare mag is a good idea.
I still haven’t perfected mag changes, let alone topping off, but now that I recently bought an IWB mag holster I like, I plan to practice more. That will come after I’m more proficient with my initial action however. Changing mags does little good if you die during the fight.
For my next time working at this, I plan to focus on correcting my errors. My goal will be better form with the same timing while maintaining the 4 shots inside the center rectangle. I’ll work on perfecting form before looking at reloads or speed. Pretty amazing to think that a 3.5 second drill can take 2600 words to analyze. Hopefully my less-than perfect demonstration offers a relatable look at how to draw from concealment.
Comment or email (my full name, all one word, at Gmail.com) with requests for other techniques that you’d like dissected.